ACACIA – Context-aware Edge Computing for Continuous Interactive Applications over Mobile Networks
Prerequisites
The ACACIA profile makes use of OpenEPC for the core part of the network. In order to use OpenEPC as part of the PhantomNet testbed, you first need to sign an OpenEPC sub-license agreement following the instructions provided here. You MUST follow this step, otherwise you will be unable to instantiate the ACACiA profile and you will get an error message mentioning that you have insufficient permissions to use the OpenEPC binaries.
For questions or comments, please contact: junguk.cho at utah.edu
1. ACACIA Overview
ACACIA is a service abstraction framework that adopts a holistic end-to-end approach to enabling low latency continuous interactive (CI) services over mobile networks offered by mobile network providers. ACACIA leverages client context information, namely proximity to landmarks and user interests, along with the SDN/NFV capabilities of the core network, to optimize both network and application processing latencies.

ACACIA consists of three components to enable CI application over mobile network.
- LTE device-to-device communication for service discovery
- Mobile Edge Network
- Context-aware application optimization
2. ACACIA Profile Overview
This tutorial is based on the work done for the ACACIA framework, published in CoNEXT 2016 (paper link). Specifically, the profile provides the ACACIA Mobile Edge Network component, which is designed to enable Mobile Edge Computing (MEC) in a mobile network.
The ACACIA Mobile Edge Network consists of
- Mobile Core Network (e.g., mme, pcrf, pcef, application function (AF) server)
- Split LTE gateways using Software Defined Network (SDN)
- Edge Clouds

With the ACACIA profile, you can do the following:
- Define the services which run on edge clouds
- On-demand network provisioning for a specific service on the mobile edge computing
- Selective traffic offloading to a specific server by using LTE QoS framework and SDN mechanisms
As such the profile illustrates a subset of the ACACIA framework functionality focused on mobile edge network. (The profile specifically does not demonstrate other ACACIA components, such as using LTE-direct for user context discovery, performing context-aware application optimization and the augmented reality retail application, all of which is described in detail in the ACACIA CoNext paper.)
3. Profile Instantiation
You first need to create a new experiment by logging in to the PhantomNet web UI. If you do not have any current experiments running you should land on the instantiate page by default, otherwise you can click on "Actions" and select "Start Experiment" from the drop down menu. Click on the "Change Profile" button. To find the profile we will use for this tutorial, type "acacia-mec" into the search box. Select "acacia-mec" from the resulting list by clicking on it. This will show a description of the selected profile. Next click on the "Select Profile" button which will take you back to the "1. Select a Profile" page. Click "Next" to reach the "2. Parameterize" page. For this tutorial we will stay with the default options, so simply select "Next" to reach the "3. Finalize" page. In this page you will see the topology of the experiment and you need to select the project in which the experiment should be created (assuming you have access to more than one projects). You might optionally also give your experiment a name at this point by typing into the "Name" field. Click "Finish". PhantomNet will now go through the process of creating and setting up your experiment (this can take some time). When your experiment goes beyond the "created" state, the web interface will show more information of the resources allocated for the experiment and the current state of each node. For example the "Topology View" tab will show the topology of your experiment and hovering over a node will show its current state. Also, pay attention to the “List View” tab which shows you how to connect to each node of the experiment using ssh.
4. How to use ACACIA Mobile Edge Network
With ACACIA profile, most of steps are executed automatically when the experiment is started. However, you need to run some steps manually.
1. Set up OpenEPC
PGWC needs PGWU information for control PGWU's data plane. So, you need to configure the information before starting an experiment. Once you run below command, you do not need to run it again. Since this command needs to access to "pgwu" node from "sgwc-pgwc", you should use "-A" option when you access to "sgwc-pgwc" node with ssh command (e.g., ssh -A <username>@<sgwc-pgwc-node>).
# in "sgwc-pgwc" node
$ cd /opt/acacia-gw/acacia/helper
$ bash run-pgwc.sh
2. Define your own service to run on edge clouds.
You need to define your services in the PCRF database by accessing the OpenEPC web interface with your web browser ( epc.<your experiment name>.<your project name>.emulab.net )
Please refer to ACACIA service registration page to define your own service.
3. Initial Internet connection from the UE ( Please refer to here for a hardware UE and here for ip.access eNodeB )
To verify that the UE was attached without problems, we can connect to it and ping some external IP. First connect to the UE debugging console. For this you first need to connect via ssh to the node “adb-tgt” (Find the appropriate ssh command from the “List View” tab of the experiment). Once connected, you need to connect to the UE using the Android Debug Bridge (ADB):
$ pnadb -a
You should see a message for a successful connection. Next, you need to get a shell to the UE:
$ adb shell
Once you get a shell to the UE, you can test if it is properly attached using ping (Note : Keep sending ping messages to internet to avoid S1 bearer release due to user inactivity since a dedicated bearer can be set up when a default bearer is active):
root#hammerhead:/ # ping 8.8.8.8
* Sometimes, the UE does not connect to OpenEPC properly due to various reasons. In this case, you can simply re-run all components ( You can reboot ip.access eNodeB in "Topology" tab of the experiment by clicking "renb1" icon and select "Reboot").
# in “adb-tgt” node
root#hammerhead:/ # reboot
# in "sgwc-pgwc" node
$ /opt/acacia-gw/acacia/helper/restarts.sh
4. Set up Local LTE SGW-U and PGW-U and run a SDN controller to control them.
To run your service on the edge cloud, we need to run local SGW-U and PGW-U on the edge cloud. Connect via ssh to the node “sguw1” and "pgwu1" (Find the appropriate ssh command from the “List View” tab of the experiment).
In "sgwu1" node, you run the script to set up local SGW-U.
# in sgwu1 node
$ sudo bash  /opt/acacia-gw/sgwu/run_sgwu.sh
Now, you run a controller to manage "sgwu1" and "pgwu1". Before running it, you need to modify "enb" values in gwu.json. (Find "enodeb0x" from the “List View” tab of the experiment, ex) "enb" : "enodeb07")
# in sgwu1 node
$ cd /opt/acacia-gw/controller
$ bash run-controller.sh
In "pgwu1" node, you run the script to set up a local PGW-U.
$ sudo bash /opt/acacia-gw/pgwu/run_pgwu.sh
5. Trigger Edge Network Connection
When your UE has an initial connection ( in step 1 ), you can request the connectivity between the UE and your service server on edge clouds. In "epc" node, you can attach an application function (AF) server with "crx.new.noid" command which needs <UE IP> <CI Server IP> <Service Name>.
$ /opt/OpenEPC/bin/squid_rx_client.attach.sh
console_loop():463> Squid Rx Client Console> crx.new.noid 192.168.3.33 192.168.10.11 ACACIA-AR
Or, you can use "android-af-call" script in /opt/acacia-gw/acacia/helper/ directory in "epc", "sgwc-pgwc", or "mme" node.
$ /opt/acacia-gw/acacia/helper/android-af-call.sh
After this command, all procedures explained in section 3 based on protocols in section 4 are executed. Now, the UE has two different bearers. One is a basic internet connection and the other is only for your service server connection.
6. The UE can interect with your service server via the dedicated bearer.
root#hammerhead:/ # ping 192.168.10.11
5. ACACIA Mobile Edge Network Work Flow in ACACIA profile
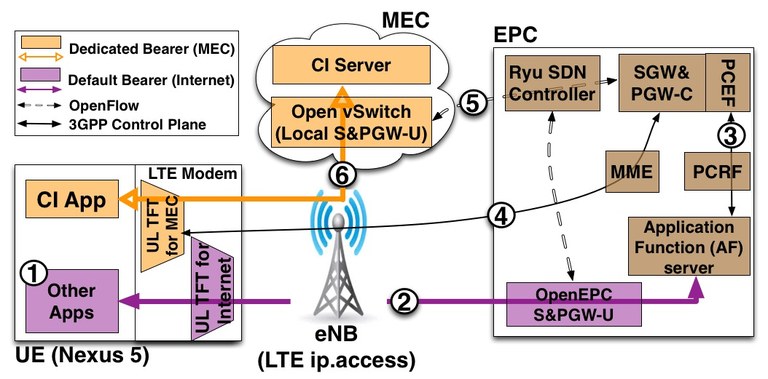
The figure above shows the detailed ACACIA Mobile Edge Network procedure.
-
Initially, the User Equipment (UE) is connected to the mobile network via a default bearer.
-
Send a MEC connectivity request from the CI app on the UE to the MEC Registration Server (MRS).
-
Create policy rules for the user’s CI app.
-
Setup a dedicated bearer in network for the user’s CI App through GW-Cs, MME, eNodeb and LTE modem in mobile device.
-
Setup flow rules in local S&PGW-U for the dedicated bearer.
-
The CI app interacts with CI server.
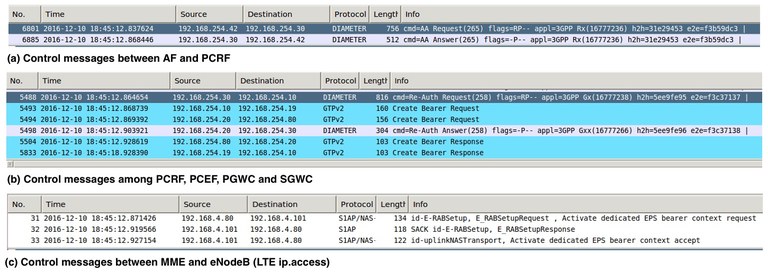
6. ACACIA Mobile Edge Network Protocol
This sequence diagram shows what protocols and messages are exchanged when you use ACACIA Mobile Edge Network. It is essentially the same as the procedure to trigger a dedicated bearer in LTE network.

The figures below show screenshots when we use the ACACIA profile. You can find all tcpdump files (you can find them /opt/acacia-gw/acacia-tcpdump/ directory in sgwu1 or pgwu1 node) which contains the control messages involved in this interaction.
7. Limitation and Plan for ACACIA Mobile Edge Network
1. Short term plan
- The profile only supports one local SGWU and PGWU. We will extend the profile to support multiple local GWUs.
- After "bearer release" happens due to a radio idle timeout, the local SGW-U is not updated. So, it loses the dedicated bearer connection. We will support this function soon.
- Delete "dedicated bearer" connection on demand.
2. Long term plan
- You can specify your service name and its QCI value in a current profile. We plan to support more parameters for better traffic control for the service.

- Combine our extensions with Open Air Interface (OAI) to make all component public.
8. For questions or comments,
contact Junguk Cho <junguk.cho at utah.edu>